Hand Drills
-
Hand Drills
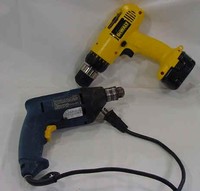
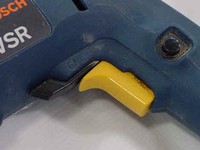
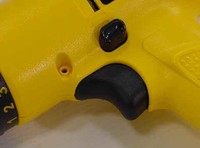
You will be using two different styles of portable drills. Both are electric but one must be plugged in, and the other runs off a rechargeable battery. Once the drill is connected to the appropriate power source, the drill can be turned off or on by squeezing the trigger. (See the pictures above and below) The trigger also lets you control the speed of the drill. The more pressure applied, the faster the drill runs. Notice that right above the trigger is a small button that will toggle back and forth. This controls the direction the drill turns. When holding the drill in your hand, the drill should turn to the right to drill into a piece of material. Flip the toggle switch the other direction and the drill will run in reverse. In the lower left picture you may notice a round, black button to the right of the yellow trigger. This is a constant on button. I do not want you to use this feature.
Installing the Drill Bit
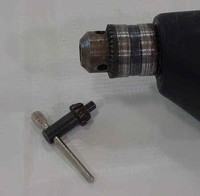
Let's begin with the electric drill with the cord. It is blue in color in the pictures. (Not to mention the cord should give it away.) This drill should be used only for drilling holes, not to drive or remove screws. This is the more powerful of the drills that we will use. To insert a drill bit, place the smooth end of the drill bit into the chuck. The chuck is the device designed to hold the drill bit in place. Snug the bit into the chuck by turning the chuck by hand. You will see that the chuck is made up of several pieces of metal that can turn independently of each other. Now tighten the chuck by using the chuck key. A picture of the chuck and key are provided below. You are now ready to drill.
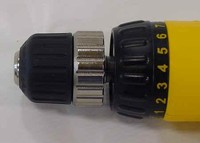
The cordless drills are yellow and are powered by a battery. Installing the the drill bit on this tool does not require a chuck key. It uses a chuck that is only tightened by hand. You should notice that these drills have a numbering system directly behind the chuck. This is for a clutch. The clutch is used to drive screws so that you do not break or strip the screw. When using the drill for drilling a hole, the clutch should be set to the highest number. When driving screws, the clutch should be set to the number that will drive the screw flush with the wood. You will know that the clutch is working by the different noise that it will make when the clutch engages.
How to Use The Tool
Now that you have installed the bit, you are ready to drill or bore a hole. The following safety rules will be applied when using this tool.
Have safety glasses on.
Change bits with power source disconnected.
Secure loose clothing or hair.
Clamp or secure the piece to be drilled. Do not drill into the tables.
Do not force the bit into the wood. Let the bit do the cutting.
Keep the drill straight up and down and left and right. Bits are not flexible.
Make sure chuck key is removed on electric drills.
Assuming that we know where we want to drill a hole in a piece of wood, we will follow this procedure. Use a nail to make a small dent where the hole is to be drilled. This will keep the drill bit from wandering off the mark. Place the end of the drill bit on the small dent/mark. Make sure that the drill is straight up and down in both planes. Slowly squeeze the trigger and gradually increase your trigger pressure to increase the drill speed. If you are making a deep hole, you have to clear the chips. This means, as the drill is running, retract the drill from the hole, making sure to keep the drill in the same plane. This will remove the chips from the hole and ensures a clean, accurate hole. Once the chips are clear, continue to drill the hole until the desired depth is reached. When the hole is complete, wait until the drill has stopped rotating and set it down. Disconnect the power source, remove the bit and put the drill away.

