Jointer
-

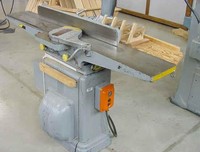
The jointer is used to give a piece of wood a working face and working edge. The combination of a working face and edge gives you a square, flat surface to work with. Without a good, square board to begin with, your project could be frustrating from the start. The jointer is also the only machine in the shop that can remove a warp from a board.
Safety Rules for the Jointer
Wear Safety glasses.
Work piece must be at least 12" long. No exceptions.
Do not joint a piece of wood that is less than 3/8" thick or 2" wide.
Never joint the end grain. (This a class rule.)
Never remove the guard.
Use push blocks when getting a working face.
Check the fence to make sure that it is square.
Never adjust the outfeed table.
Maintain a 4" margin of safety.
In our shop, the depth of cut is 1/16".
Parts of the Jointer
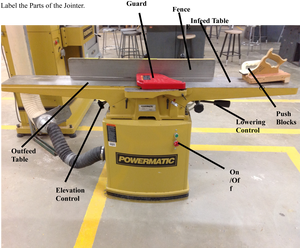
Study the parts of the jointer below. It is crucial for you to know and understand what function each performs.

1. The fence guides the work piece along the table. Always check to see that the fence is 90 degrees to the table.
2. This part of the machine supports the work piece at the end of the cut. It should never be adjusted by students.
3. The guard keeps the operators hands from exposure to the blade. Never remove or pull back the guard while the machine is running.
4. Before the depth of cut can be adjusted, the infeed table lock must be loosened. By loosening the infeed table lock, the infeed table is able to slide up and down easily.
5. The depth scale indicates how deep of a cut the jointer will make with each pass.
6. The infeed table adjustment wheel allows the infeed table to be raised or lowered. It works in conjunction with the infeed table lock and depth scale.
7. The On/Off button turns the machine off and on.
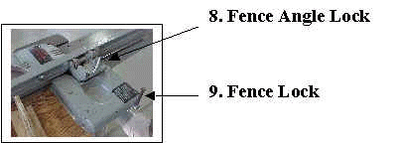
8. The fence angle lock is used to make adjustments to the angle of the fence. When loosened, the fence angle will slide easily. Only loosen 1/2 a turn. Do not unscrew it all of the way.
9. The fence lock controls how wide of a board we can joint. When the fence is all the way back, the widest board that we can joint is 8" This is how jointers are sized.
10. Push blocks are used for jointing the surface of a piece of wood. We will use them all of the time.


How to use the Jointer
When you approach the jointer the first two things you must do are: first, check the depth of cut, which is 1/16th of an inch and second, be sure the fence is square to the table. Once these two things are confirmed, we will make our working face. Turn the jointer on. Set your piece of wood on the infeed table, with the crown facing up. Pick up the push blocks and set the one in your left hand toward the front of the board and the push block in your right hand toward the end of the work piece. Apply a firm but steady pressure in the down and forward direction. Walk with the piece, do not over extend yourself. The jointer will shave 1/16" off of your board. Make sure that you have equal pressure on both push blocks as you move the wood across the cutter head. If you have too much pressure on your right hand push block, the jointer will take a snipe out of the end of your wood. A snipe is just a big chunk out of the end. You may have to take two, maybe three passes across the jointer to get a good working surface. Anymore than that and you begin to put a taper on your piece of wood. Once you have a good working face, in pencil, write WF in big letters on the working face side. This will help you and I later on in the process. Now we can get a working edge.
Place your working face against the fence and the edge you would like to joint on the infeed table. Make a fist with your left hand. Put the meaty part of your hand on the front top edge and your clenched fist against the rough face of the board. With your right hand, make like your are going to hitch hike. Your thumb will rest on the top, back edge of you board. Your closed fingers will be on the end of the board. Once again, apply a firm and forward pressure. Walk with the board as it crosses the cutterhead. Remember how important it is to keep an even pressure. Only a couple of passes across the cutterhead should be needed. Mark with side with a big WE. This stands for working edge. The working face and edge will remain with the board through the entire process. We do not want to cut these off in the future.

